PokeCenter Kiosk
Introduction
Project Description
With a new Computer Science building in construction at the University of Illinois Chicago, this project proposes a potential kiosk that can be found at the right side of the building entrance. Focused on immersive Virtual Reality (VR) at room scale, a user can interact with the kiosk using a Virtual Reality headset. Pokemon-themed, the kiosk is, for the most part, loosely modeled after the Pokemon Center found in Pokemon FireRed and LeafGreen (2004). It sells items that can be found throughout the Pokemon franchise.
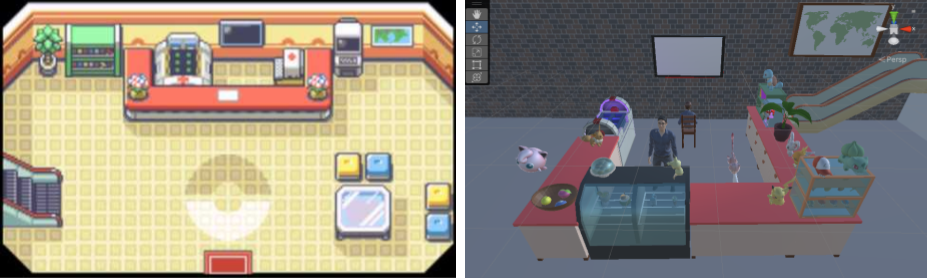
As shown in the image comparison above, the kiosk includes an escalator, map, Pokemon healer, TV, green shelf, potted plant, and red counter to closely resemble the Pokemon Center on the left.
Video
How To Use the Application
In order to use the application, one must first download the project from GitHub and install the necessary software. Assuming that the steps described in the section titled "Instructions to Build and Run" have been followed, the user can now walk around the space and interact with the kiosk. The user is able to grab and toss over twenty items such as the food, books, Pokeballs, and Pokemon. Additionally, they can duplicate items by interacting with the Pokeball dispenser, microwave, Pokemon healer, and TV. Pressing the red button of the Pokeball dispenser spawns red Pokeballs that can be grabbed and thrown. Similarly, pressing the silver button of the microwave spawns many curry bowls that can be grabbed and thrown. Picking up Eevee and tossing them into the Pokemon healer causes them to evolve into Espeon. Finally, pressing the red button on the right side of the TV turns it on. Doing so plays the opening theme of the Pokemon anime. Pressing the red button again turns the TV off.
Instructions to Build and Run
Downloading Project from GitHub
To begin, download the project from the following link by clicking on the green button that says "Code" and selecting "Download ZIP":
Group4.Project2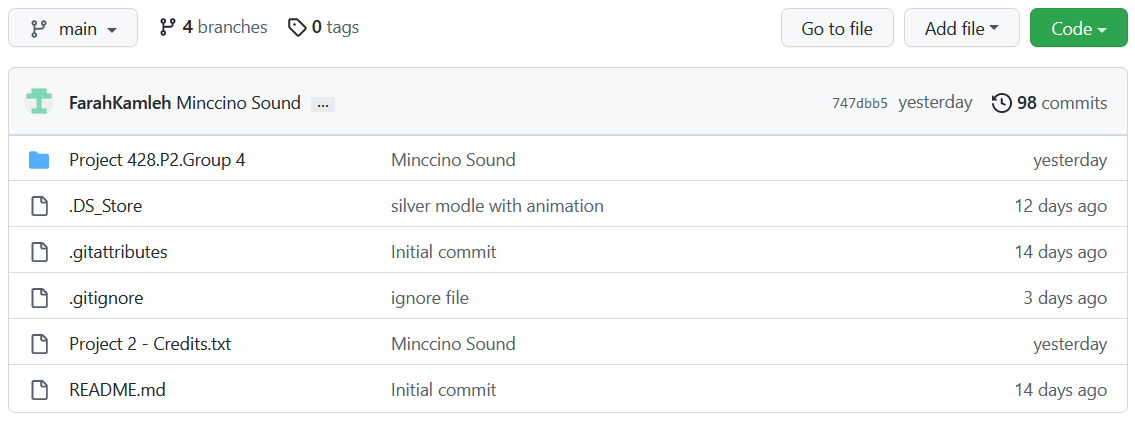
Installing Unity and Unity Hub
Extract the ZIP file as needed. The next step is to install Unity. To do so, go to https://unity.com and select the blue "Get Started" button at the top. Select the "Individual" tab and click on another blue "Get started" button underneath "Personal". Download Unity Hub for your preferred platform. Install Unity Hub which will host your Unity projects. In Unity Hub, click on "Installs" then "Install Editor" to install a new Unity version. This project uses version 2021.3.6f1. Visit the download archive at https://unity3d.com/get-unity/download/archive and select Unity 2021.x to find the correct version. Install using Unity Hub. It should then appear there. Open the project by pressing the "Open" button in "Projects". While not required to download and install, it should be noted that the project makes use of VRTK version 4.

Building and Running on the Quest
Connect the Quest headset to the laptop using a suitable USB cable. Put on the Quest headset and use the controllers to tell the Quest to accept the PC connection and always allow that connection. Make sure developer mode is on. Click on the Quick Settings menu on the left side of the thin menu, then click on the settings menu on the upper right. Next, scroll down in the menu on the left to Developer and turn on the USB Connection Dialog.
In the hierarchy of the Unity project, make sure CameraRigs.UnityXRPluginFramework is enabled while CameraRigs.SpatialSimulator is disabled. Under Unity Build Settings, make sure you are building for the Android Platform and the Quest connected shows up under the Run Device list of compatible connected devices. If it does not show up, unplug and re-plug the USB cable, then tell the Quest to accept the connection to the laptop again. Save the project and restart Unity.
Click on Build and Run. It should take about 5 to 10 minutes for Unity to convert all the assets to a form suitable for the Quest. Disconnect the USB cable from the Quest, put on the Quest headset, and grab the two controllers. The app should start automatically.
Included Assets
Downloaded Assets - 3D Models
The following is a list of all the 3D models that have been downloaded from the internet as well as their sources and credits. Included are short descriptions of how each relate to the requirements of the project. In the images of this section, the red numbers represent the downloaded 3D models.
- Escalator: The escalator model intends to decorate the space like that of the Pokemon Center from the game. It serves as the first of four models with an animation. It can be found here: https://sketchfab.com/3d-models/esclator-fb5a4343e7d54a7ca8cd498797c2c69b
- Master's Cap: The master's cap model serves as the first of twenty items that can be grabbed and thrown. It can be found here: https://sketchfab.com/3d-models/pokemon-masters-cap-892e724659c44d6c8771252523075b54
- Badges: The badges serve as the second of four models with an animation. They can be found here: https://sketchfab.com/3d-models/pokemon-badges-5f4b103a05324943b2befd4b663dbaa0
- Mew: The Mew model serves as the third of four models with an animation. It can be found here: https://sketchfab.com/3d-models/mew-flying-5c3814b08f48493396f298d48629d4dc
- Potted Plant: Like the escalator, the plant serves to decorate the kiosk like the Pokemon Center. It can be found here: https://sketchfab.com/3d-models/potted-plant-83986836419445edb3e507b9eb0c786b
- Squirtle: The Squirtle model serves as the first of eight models with sound. It can be found here: https://sketchfab.com/3d-models/squirtle-df11cb9c684e4a5fad6eec86d590774d
- Minccino: The Minccino model serves as the second of twenty objects that can be grabbed and thrown. Additionally, it serves as the second of eight objects with sound. It can be found here: https://sketchfab.com/3d-models/minccino-dc603c3c630e4e919fa07bbebc633043#download
- Torchic: The Torchic model serves as the third of twenty objects that can be grabbed and thrown. It can be found here: https://sketchfab.com/3d-models/torchic-02ddbf9af2a546f197952a1843dcfc05
- Bulbasaur: This model serves as the fourth of four objects with an animation. It can be found here: https://sketchfab.com/3d-models/bulbasaur-pokemon-animated-d2a9a7962613438387880a195cd8a1df
- Mudkip: This model serves as the fourth of twenty objects that can be grabbed and thrown. It can be found here: https://sketchfab.com/3d-models/258-mudkip-43fc7ab80a0a4f19894b119d4cb2e622
- Ultra Ball: This model serves as the fifth of twenty objects that can be grabbed and thrown. It can be found here: https://sketchfab.com/3d-models/ultra-ball-pokemon-6f2a35f49dd54af18e774c4fdf5c0f84
- Pikachu: This model serves as the third of eight objects with sound. It can be found here: https://sketchfab.com/3d-models/pikachu-273766237c614ab1bbaf094c9fc72a3e
- Curry: This model serves as the sixth of twenty objects that can be grabbed and thrown. It can also be duplicated by pressing the microwave button. It can be found here: https://sketchfab.com/3d-models/green-curry-thai-121310a3fb834e0791a35c95d5b5ec30
- Mimikyu: This model serves as the fifth of four models with an animation. There are more models with animations than required. It can be found here: https://sketchfab.com/3d-models/mimikyu-ad2aaa7bb372441984f40df49854b3eb
- Ice Cream (Casteliacone): This model serves as the seventh of twenty objects that can be picked up and thrown. It can be found here: https://sketchfab.com/3d-models/ice-cream-cone-5d97c7ec9ac14e3ba8fe03644460fc0e
- Moomoo Milk: This model serves as the eighth of twenty objects that can be grabbed and thrown. It can be found here: https://sketchfab.com/3d-models/milk-7212d41012594906a72d3b5adc260d0c
- Berry Juice (Coconut Drink): This model serves as the ninth of twenty objects that can be grabbed and thrown. It can be found here: https://sketchfab.com/3d-models/coconut-drink-05a7d1d72e5e4a5ebfe7705b8166d362
- Lemonade: This model serves as the tenth of twenty objects that can be grabbed and thrown. It can be found here: https://sketchfab.com/3d-models/homemade-lemonade-85c0c24608ca44c9a77a7210518bb25d
- Sitrus Berry: This model serves as the eleventh of twenty objects that can be grabbed and thrown. It can be found here: https://sketchfab.com/3d-models/sitrusberryzip-cKsIEKgi0NgPnG9yk6quoS7sBU
- OranBerry: This model is the twelfth of twenty objects that can be grabbed and thrown. It can be found here: https://sketchfab.com/3d-models/oran-berryzip-5f8TCojZ7To8mT0EGgedy4aOaa
- Pecha Berry: This model serves as the thirteenth of twenty objects that can be grabbed and thrown. It can be found here: https://sketchfab.com/3d-models/pechaberryzip-6qeM3YAFAEA0btMLveFHAGH7ivQ
- JigglyPuff: This model serves as the sixth of four models with an animation. It also serves as the fourth of eight objects with sound. It can be found here:https://sketchfab.com/3d-models/pokemon-jigglypuff-846a4936fa3f45cf840d25cbd7382e85S
- Eevee: This model serves as the fifth of eight objects with sound. It also serves as the fourteenth of twenty models that can be grabbed and thrown. It can be found here: https://sketchfab.com/3d-models/133-eevee-6b379c7d5e1d445fbdcfba0ef50594eb
- Map: The map serves to decorate the kiosk like a Pokemon Center. It can be found here: https://sketchfab.com/3d-models/world-map-static-0eedf0e3ebfe4bec9ea6e86b92068024
- Espeon: This model serves as the sixth of eight objects with sound. It also serves as the fifteenth of twenty objects that can be grabbed and thrown. It can be found here: https://sketchfab.com/3d-models/espeon-b12f30cf97de4ac5b312312ae1c31b73
- Dispenser: This model serves as the first of four interactive objects. When the red button is pressed, Pokeballs spawn each time. It can be found here: https://sketchfab.com/3d-models/gachapon-machine-ba7dd992be614b3185d24177dde6a127#download
- Bread (Big Malasada): This model can be found here: https://sketchfab.com/3d-models/bread-699345e2e6af4dbdbb21b333ea9c999f
- Healer: This model serves as the second of four interactive objects. When Eevee is tossed onto the healer, they evolve into Espeon and vice versa. This model can be found here: https://sketchfab.com/3d-models/pokemon-healer-7e105d0bd978459d9150260f29745dbd
- Microwave: This model was provided in the starter project. It serves as the third of four interactive objects. When the silver button is pressed, curry repeatedly spawns. Additionally, when the button is pressed, a beep noise occurs, making it the seventh of eight objects with sound.
- Fridge: This model was provided in the starter project. It serves as the eighth of eight models with sound.
- Glass Top: This model was provided in the starter project. It serves as the sixteenth of twenty objets that can be grabbed and thrown.
- Shelf: This model was provided in the starter project. It intends to decorate the kiosk like the Pokemon Center which also has a green bookshelf.
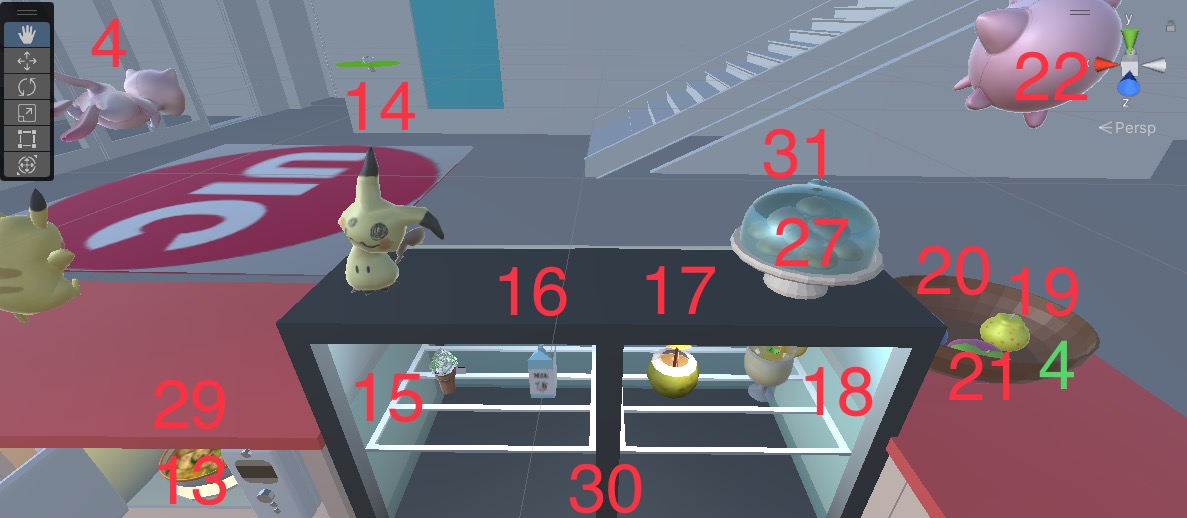
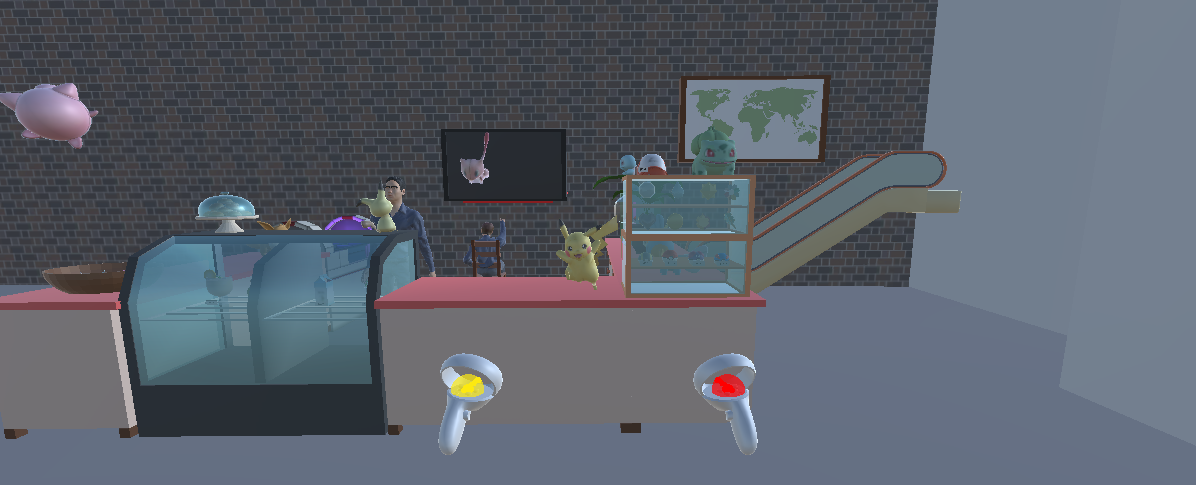
The image above numbers the models found at the front side of the kiosk.
Downloaded Assets - Sounds
The following is a list of all the sounds that have been downloaded from the internet as well as their sources and credits. Included are short descriptions of how each relate to the requirements of the project.
- Pokemon Center RSE Music: This piece of music, originating from Pokemon Ruby and Sapphire (2002), serves as one of two relevent ambient sounds and can be heard in the background. It can be found here: https://downloads.khinsider.com/game-soundtracks/album/pokemon-ruby-sapphire-music-super-complete/1-13%2520Pok%25C3%25A9mon%2520Center.mp3
- Pikachu Sound: The sound of Pikachu speaking serves as the first of eight sounds that get louder as you get closer to the source. It can be found here: https://mobcup.net/ringtone/simple-notification-sound-emj223zn
- Squirtle Sound: The sound of Squirtle speaking serves as the second of eight sounds that get louder as you get closer to the source. It can be found here: https://mobcup.net/ringtone/squirtle-nrkctw8a
- Eevee Sound: The sound of Eevee speaking serves as the third of eight sounds that get louder as you get closer to the source. It can be found here: https://mobcup.net/ringtone/eevee-8didua9t
- Espeon Sound: The sound of Espeon serves as the fourth of eight sounds that get louder as you get closer to the source. It can be found here: https://mobcup.net/ringtone/espeon-ajv63ils
- Jigglypuff Sound: The sound of Jigglypuff speaking serves as the fifth of eight sounds that get louder as you get closer to the source. It can be found here: https://mobcup.net/ringtone/jigglypuff-8ouuze6t
- Fridge Sound: The sound of the fridge humming servers as the sixth of eight sounds that get louder as you get closer to the source. It can be found here: https://quicksounds.com/library/sounds/refrigerator
- Microwave Beep: When the button of the microwave is pressed, a beep sound can be heard. This sound serves as the seventh of eight sounds that are triggered by interacting with objects in the scene. It can be found here: https://quicksounds.com/library/sounds/microwave
- Minccino Sound: The sound of Minccino speaking serves as the eighth of eight sounds that get louder as you get closer to the source. It can be found here: https://mobcup.net/ringtone/minccino-cry-yc69ac98
- It's Pikachu Sound: This sound serves as one of the two speaking sounds for the MakeHuman models. When the Farah MakeHuman is touched, they say, "It's Pikachu!". This sound can be found here: https://www.myinstants.com/en/instant/its-pikachu-674023/. It should be noted that the Silver MakeHuman's sound is a recording of Silver himself.
- Pokemon Opening Theme Video: The video of the Pokemon anime's opening theme serves as the second of two relevant ambient sounds that can be heard in the background, It is triggered when the TV is turned on. Doing so causes the Pokemon Center music in the background stop and vice versa. It can be found here: https://www.youtube.com/watch?v=rg6CiPI6h2g

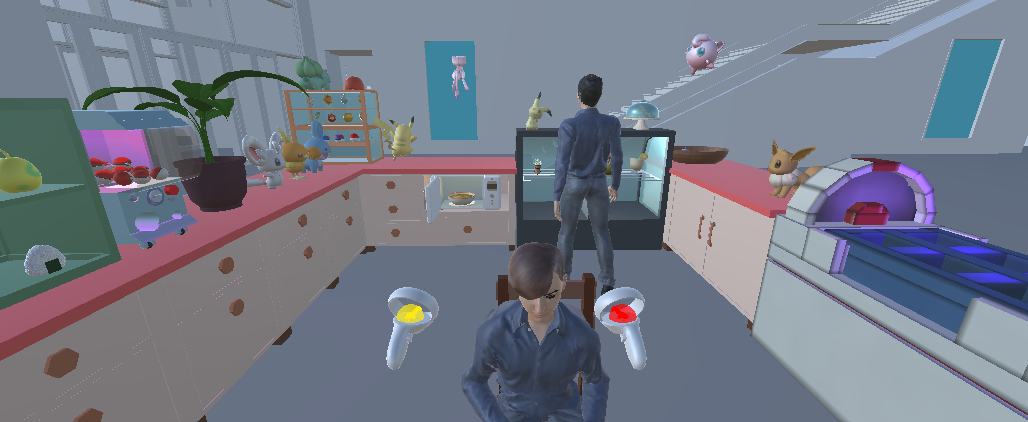
The image above numbers the models found at the left side of the kiosk.
Student-Made Models
The following list is of all of the models created by Silver Vo and Farah Kamleh. It should be noted that they have all been created in Blender. In the images of this section, the green numbers represent the student-made models.
- TV: Modeled by Silver, the TV serves as the fourth of four interactive objects. When the button on the right of the TV is pressed, the opening theme of the Pokemon anime plays on the screen. It spawns a video player object. It also serves as the first of ten student-made models.
- Books: Modeled by Silver, the books serve as the seventeenth of twenty objects that can be grabbed and thrown. They serve as the second of ten student-made models.
- Chair: Modeled by Silver, the chair is being used by the Farah MakeHuman. It serves as the third of ten student-made models.
- Fruit Basket: Modeled by Silver, the fruit basket serves as the fourth of ten student-made models.
- Pokeball: Modeled by Silver, the Pokeball serves as the eighteenth of twenty models that can be grabbed and thrown. Additionally, it serves as the fifth of ten student-made models.
- Aspear Berry: Modeled by Farah, the aspear berry serves as the nineteenth of twenty models that can be grabbed and thrown. It also serves as the sixth of ten student-made models.
- Tamato Berry: Modeled by Farah, the tamato berry serves as the twentieth of twenty models that can be grabbed and thrown. It also serves as the seventh of ten student-made models.
- Rice Balls: Modeled by Farah, the rice balls serve as the twenty-first of twenty objects that can be grabbed and thrown. They also serve as the eighth of ten student-made models.
- Master Ball: Modeled by Farah, the master ball serves as the twenty-second of twenty objects that can be grabbed and thrown. It also serves as the ninth of ten student-made models.
- Great Ball: Modeled by Farah, the great ball serves as the twenty-third of twenty objects that can be grabbed and thrown. It also serves as the tenth of ten student-made models.
- Map Frame: Modeled by Silver, the frame of the map serves as an eleventh student-made model.

The image above numbers the rest of the models found at the front side of the kiosk.
Additional Lighting
As required, four new lights have been added to the kiosk. They include the yellow light in the microwave, the purple light in the Pokeball dispenser, the white light in the fridge, and the purple light on the healer.
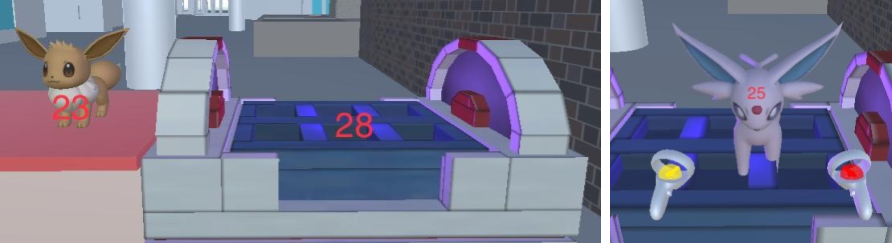
The image above numbers the models found at the right side of the kiosk.
MakeHuman Models
There are two human models in the scene, each representing a single student who worked on the project. Created using MakeHuman, the human models represent Silver Vo and Farah Kamleh. The model for Silver can be found standing near the fridge. He has an idle animation downloaded from Mixamo. When touched by the user, he speaks and states the price of the Pokeballs. The model for Farah, on the other hand, can be found sitting on the chair facing the TV. The downloaded Mixamo animation makes them point towards the screen of the TV. When touched, they yell, "It's Pikachu!".
Frame Rate
When tested in the Quest 1 headset, the lowest frame rate observed was 31 while the highest was 72. The lowest frame rate occurs when turned towards the exit of the building. The highest frame rate occurs when when looking upwards and downwards inside of the building. When interacting with objects in the scene, the frame rate remains stable.
Discussion
Farah's Response
There is a drastic difference that can be observed when viewing and interacting with the Pokemon-themed kiosk using the Unity simulator and the Quest 1 headset. To work with the Unity simulator, one needs only to press the Play button in Unity and the running project will be visible in Unity's Game View. The user will be placed in front of the kiosk with the left and right controllers, colored yellow and red respectively, in view. In order to look around, the user can use their mouse or mousepad. In order to move forward, back, left, and right, they can use the WASD keys on their keyboard. To take control of the left controller, the 2 key on the keyboard must be pressed. Doing so will allow the user to rotate the direction of the controller using the mouse or mousepad and move it forward, back, left, and right using the WASD keys as they would their body. The right controller is used in the same way except that it is wielded by pressing the 3 key instead of the 2 key. To return to controlling the body, the user must press the 1 key.
To deploy the project onto a Quest 1 headset, one must follow the instructions provided in the section titled "Building and Running on the Quest", ensuring that, in Unity's hierarchy, CameraRigs.UnityXRPluginFramework is enabled while CameraRigs.SpatialSimulator is disabled. Using the Quest 1 headset, the user has the ability to teleport around the kiosk as they please, but they also have the option to walk around the space using their legs which is the intention of the project, as it was created with the scale of human users in mind. As though they are in a real space in the real world, the user can grab and interact with objects using their "hands". With a controller wielded in each hand, the user can grab over twenty objects and interact with four of them, producing spawns and duplicates. For example, to turn on the TV, the user simply has to stretch their hand out towards the red button on the right side and "press" it. Similarly, to grab and toss an item, the user need simply to reach out their hand towards the object, press a button, raise their hand, and toss at a distance of their choosing using a strength of their choosing as they would in the real world.
It can be argued that working with the Quest 1 headset as opposed to the Unity simulator is easier, especially when it comes to movement and interaction. The user can treat their virtual surroundings as they would their real-world surroundings. If they want to move to a specific location in the space, they simply need to walk there using their legs. If they want to pick up an object, they simply need to reach out and grab it. Using the Unity simulator, on the other hand, comes with its own challenges. For example, assessing the distance at which a controller will travel when a key is pressed proves difficult, making it tricky to grab an object and toss it as a result. Attempting to do so often results in a controller that has flown far too forward or back than intended, eventually disappearing from the view of the user.
Silver's Response
This second project is very interesting because it introduced me to virtual reality development in unity. A second thing I like about virtual reality is that you can put most things to scale and you’ll feel more immersed because a door looks like a door in your view, and a table is how big a normal table is etc...
About the visual aspect, VR can't quite match the feel of real life for obvious reasons. The first reason is display horsepower, we see things in incredibly high definition with a peripheral and center vision that not many headsets have at the moment. Human vision is complicated and to mimic that within VR takes years of software and hardware development. The second reason is the power behind it all to run those hypothetical displays. Right now the quest has the capability to run applications and games at 1920 x 1832 per eye, which is far lower than what is needed but it already has issues with performance with some games already. We need the power of these mobile chips to improve drastically or alternatively get a very high end PC to run it and connect using cable.
Another thing to consider is the sense of touch, you can't really feel the objects you're picking up. Other than visually, you won't be able to tell the object's shape in your hand. Texture is also something to think about. Everything around us has a distinct texture, wood, fabric, metals, etc...You just won't have these contexts if you're using something virtual rather than real life.
Sound isn't much of an issue but it is a very important sense that we use for immersing ourselves in the world around us. Sometimes you close your eyes and listen to the sounds surrounding you for that reason. Not to say that VR can't match that right now, but the way audio works in game engines isn't quite like real life just yet, and the quality of the audio system whether separate or included in the headset itself won’t be enough to bridge the gap. You can get pretty close and your brain will fill in the missing gaps.
This is the final one and I think the most important one to cover. For me when I play virtual reality games the thing that will always get to me is motion sickness during extended play time. Because when we run or bike or jump. Our bodies know that we are in motion when we're doing those actions. Virtual reality on the other hand, can't give you that important context to your brain so that it won't be confused between what you're seeing and what you're experiencing. This is why it's hard for most people to get into Virtual reality because they get motion sickness when first starting out. You can only help with something like a racing set up with pistons moving you or a floating chair that creates the illusion of movement to bridge the gap. But this is one thing that we'll never solve because it's not a matter of hardware or software but it's just the matter of physics.